Implementing Bilinear Interpolation for Image Resizing
There are several editing tools that we can use to resize any image to any desired size. Apart from that, if you’re coding there are plenty of libraries available for every programming language where you can resize an image with just a single line of code without worrying about the details. You might be thinking, “why should I waste time on thinking and writing a code to resize images when I can have an editing application or a robust library take care of it”. However, I am guessing you’re here because you are probably curious about what goes on behind the scenes when you resize an image and you’d like to implement the resizing algorithm from scratch to understand it better. I decided to work on Image Resizing for the same reasons. So let’s get started.

One of the key aspects of image resizing is Interpolation. If you look up the meaning of the term Interpolation you’ll learn that it means estimating unknown values using related known values. This is exactly what we need to do when resizing an image. Using the known pixel values we estimate the pixel value at any particular location in the resized image. There are several interpolation techniques that can be used when resizing images such as Nearest Neighbour Interpolation, Bilinear Interpolation, and Bicubic Interpolation. Here, I will walk you through the implementation of Bilinear Interpolation to resize images and we’ll also discuss some problems that we might face on the way, and the solutions as well.
Before we proceed with the implementation, I would like to mention that this post will solely focus on the implementation of bilinear interpolation. Hence, I am assuming that you are already familiar with the concept of bilinear interpolation. However, if you’re not, I have your back. Here is the link to a youtube video: https://www.youtube.com/watch?v=hpqrDUuk7HY&list=PLjMXczUzEYcHvw5YYSU92WrY8IwhTuq7p&index=3&t=3074s. Open it and skip to 56:20. You will find a crystal clear explanation of the bilinear interpolation method.
Okay, so now let’s start coding to implement it. We will implement the algorithm in python3 and use Numpy. It is better to create a function for bilinear interpolation and resizing. The block of code below creates a function called bl_resize and takes 3 arguments:
def bl_resize(original_img, new_h, new_w):original_img : Original Image array,
new_h: desired height of the resized image, and
new_w : desired width of the resized image.
- Inside the function, we need to get the dimensions of the original image which can be obtained using .shape method.
- In the next step, we create an empty array named resized of shape (new_h, new_w, c) containing all 0s.
- Now we calculate the scaling factors along the two dimensions. It contains an if/else check to avoid division by 0 in case new_h or new_w is equal to 0.
def bl_resize(original_img, new_h, new_w):
 #get dimensions of original image
 old_h, old_w, c = original_img.shape
 #create an array of the desired shape.
 resized = np.zeros((new_h, new_w, c))
 #Calculate width and height scaling factors
 w_scale_factor = (old_w ) / (new_w ) if new_h != 0 else 0
 h_scale_factor = (old_h ) / (new_h ) if new_w != 0 else 0
4. To fill in the pixel values of the empty array we will iterate through the pixels using 2 for loops that run along the 2 dimensions.
5. To estimate the pixel value in the new array we need to map its coordinate values back into the original image array. This is done by multiplying the coordinate values i,j with the scaling factors of the corresponding dimensions to obtain x and y values.
6. Recall that to estimate a pixel value using Bilinear Interpolation we need the values of 4 neighboring pixels from the original image. Hence, now we calculate the coordinate values for the 4 neighboring pixels.
(Note: while calculating the ceiling values, it is important to ensure that its value remains in the range (0 to old_h-1) and (0 to old_w-1) to avoid IndexError.
for i in range(new_h):
 for j in range(new_w):
  #map the coordinates back to the original image
  x = i * h_scale_factor
  y = j * w_scale_factor
  #calculate the coordinate values for 4 surrounding pixels.
  x_floor = math.floor(x)
  x_ceil = min( old_h - 1, math.ceil(x))
  y_floor = math.floor(y)
  y_ceil = min(old_w - 1, math.ceil(y))
7. Using the coordinate values, we get pixel values (v1, v2, v3, and v4) of these 4 neighboring pixels.
8. Using the neighboring pixel values we estimate the pixel value q and assign it to the pixel at coordinates (i,j) in the new image array.
    #get the neighbouring pixel values
    v1 = original_img[x_floor, y_floor, :]
    v2 = original_img[x_ceil, y_floor, :]
    v3 = original_img[x_floor, y_ceil, :]
    v4 = original_img[x_ceil, y_ceil, :]    #Estimate the pixel value q using pixel values of neighbours
    q1 = v1 * (x_ceil - x) + v2 * (x - x_floor)
    q2 = v3 * (x_ceil - x) + v4 * (x - x_floor)
    q = q1 * (y_ceil - y) + q2 * (y - y_floor)
    resized[i,j,:] = q
  return resized
That’s it! We’ve implemented Bilinear Interpolation to resize an Image. But wait, before we wrap it up let us check whether we get what we want. Copy the code and try to resize an image of your choice.
This is what I see when I try to shrink an image:
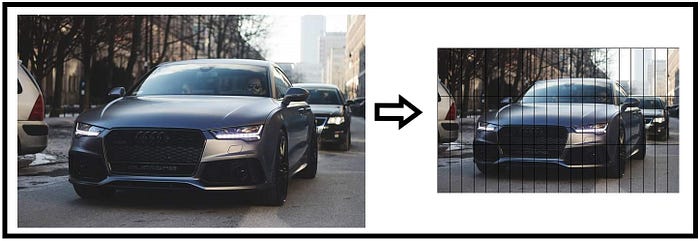
Well, this is not what we want. Why is there a grid-like structure on top of the image?
Go back to the code inside the nested for loops. What would happen if either x or y or both have integer values? In such a case, what would be the values of q1, q2, and q?
This happens when either x or y is an integer resulting in q=0. When x is an integer, x_floor and x_ceil will have the same value as x. As a result, both q1 and q2 will be 0 and finally, q will be 0 as well. On the other hand, if y is an integer, y_floor and y_ceil will have the same value as y. Consequently, we will get non-zero values for q1 and q2 but q will be 0 since
y = y_floor = y_ceil.
To avoid this issue, we just need to add some additional checks in the form of if/else loops before calculating q1, q2, and q values to handle such cases. There can be three possible cases:
Case 1:When both x and y have integer values
When both x and y are integers, it means that the coordinates of a pixel in the resized image coincide with a particular pixel of the original image. In such a case, there is no need to estimate the pixel value. We can straightaway assign the value of the coinciding pixel.
if (x_ceil == x_floor) and (y_ceil == y_floor):
    q = original_img[int(x), int(y), :]
Case 2 and 3: When either one of them is an integer.
When either one is an integer, bilinear interpolation turns into linear interpolation as shown in the figure below.
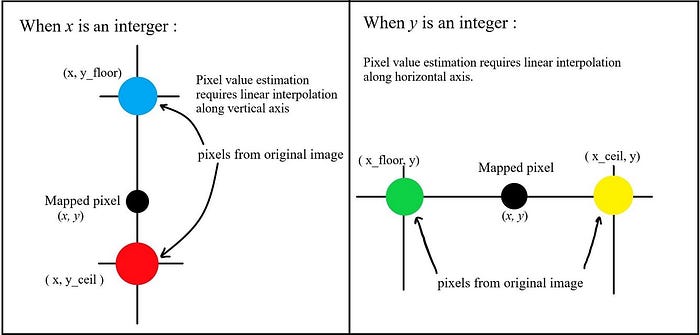
   elif (x_ceil == x_floor):
     q1 = original_img[int(x), int(y_floor), :]
     q2 = original_img[int(x), int(y_ceil), :]
     q = q1 * (y_ceil - y) + q2 * (y - y_floor)
   elif (y_ceil == y_floor):
     q1 = original_img[int(x_floor), int(y), :]
     q2 = original_img[int(x_ceil), int(y), :]
     q = (q1 * (x_ceil - x)) + (q2  * (x - x_floor))
With these additional checks in the form of if/else loops we can be sure that no pixel will be wrongly assigned 0 value when x and y are integers.
Here is the final code to resize images using Bilinear Interpolation:
Well, that’s it. We have successfully implemented Bilinear Interpolation to resize images. You can use OpenCV to read, write and display resized images.
Resizing modern-day images, that are very high in resolution, using this code will take some time as its runtime complexity is O(n²) because of the two nested for loops.